Connecting to Sentinel’s DVPN As a Client (User) via CLI (Command Line Interface)
Want to use the Sentinel DVPN as a user (client) directly from terminal (CLI) on your computer?
This guide will go through that – with a Mac (same process for Linux)
Note – This guide will make a new user account / new DVPN wallet.
Pre-Requisites – BREW & Wireguard
Before going through this guide, it is best to check if you have 2 other dependencies you’ll need:
BREW and Wireguard
To check if you have it – in the terminal type:
brewIf that shows up, great.
You’ll then need to install Wireguard in brew
Use this command:
brew install wireguard-toolsOnce that is finished installing – you can test if you have wireguard Open a new Terminal window
Type:
wg-quickAnd then:
wg --helpAnd it should show up a list of help commands.
So now you have Brew and Wireguard and can use the CLI of Sentinel, congrats!
Tip – Use this Menu of Commands
Here is the official list of Sentinel CLI commands, that helped us make this guide. This is the “master reference” you can bookmark.
Commands for Sentinel #dVPN (Cosmos) CLI Client:
https://github.com/sentinel-official/docs/blob/master/guides/clients/cli/COMMANDS.md
Ok, now we have all of that out of the way – let’s get started!
Step 1 – Open Terminal & Download Sentinel’s CLI
Download CLI for Sentinel using this command:
curl --silent https://raw.githubusercontent.com/sentinel-official/cli-client/development/scripts/install.sh | sh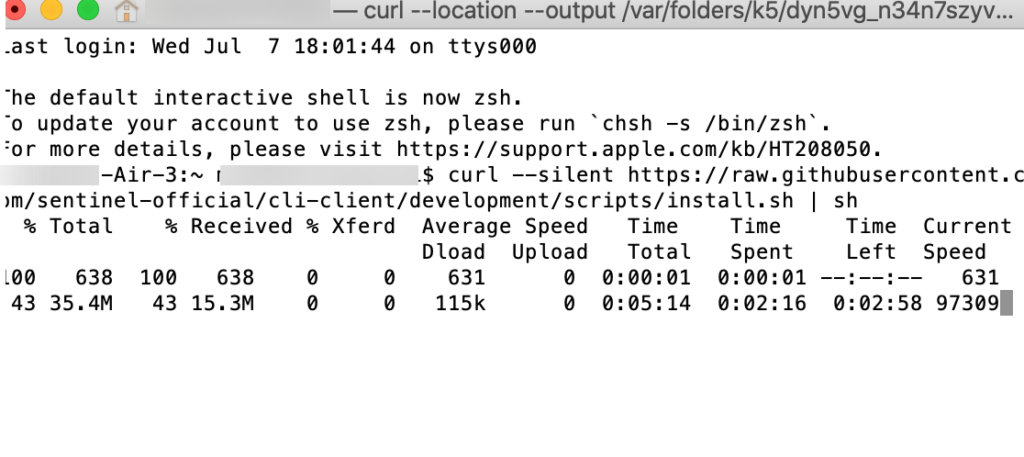
It is about 35 mb in file size.
Step 2 – Create a Wallet (User account)
Use this in the terminal:
sentinelcli keys add \
    --home "${HOME}/.sentinelcli" \
    --keyring-backend file \
    walletname
Note – want to recover a wallet / user account? Simply add —recover at the end of the request.
It will then ask you to make a key phrase – this is the password you will use for this account (it is not the seed phrase)
Step 3 – Fund the account (wallet) with DVPN token
Now, because we are a customer / client / user – we need to obtain DVPN token (the token of the Sentinel blockchain protocol).
How much?
Good question – it is extremely affordable, but of course we don’t want to always go to buy more – so we recommend 100 dvpn to start (which at 0.025 USD/token is $2.50 USD).
Check other guides on how to buy DVPN token:
https://bluefren.medium.com/guide-how-to-acquire-sentinels-dvpn-token-on-osmosis-65be6ba46584
We recommend Osmosis DEX here:
https://app.osmosis.zone
With Gravity Dex coming also in July 2021.
Once you have those token, you can send them to your CLI wallet account you made.
Step 4 – Check which IP You’d Like to Connect to (Query Nodes)
Now that you have some funds, and have the wallet setup, time to look for a node (IP address / location) that you would like to connect to.
Use this command:
sentinelcli query nodes \
    --home "${HOME}/.sentinelcli" \
    --node https://rpc.sentinel.co:443 \
    --page 1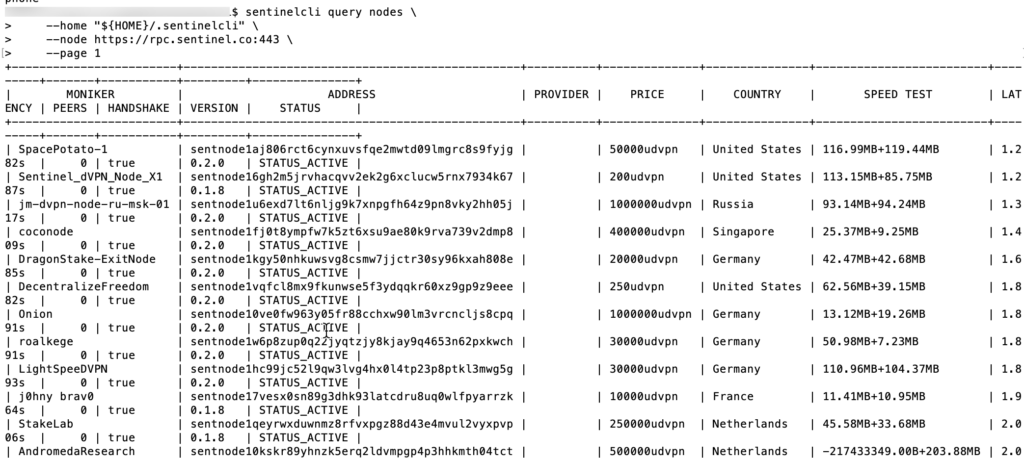
Take note of the locations, the price, the speed test.
Pick one by copying the wallet address.
Step 5 – Double check that node (query a specific node)
Once we see the list of nodes, and pick one, we can of course directly connect, but we can also double check by querying the node specifically
Do this with this command
Query the specific node address (make sure small S in the address)
sentinelcli query node \
    --home "${HOME}/.sentinelcli" \
    --node https://rpc.sentinel.co:443 \
sentnode1vqfcl8mx9fkunwse5f3ydqqkr60xz9gp9z9eee
Will give you this
+---------------------+-------------------------------------------------+----------+----------+---------------+-----------------+---------+-------+-----------+---------+---------------+
|       MONIKER       |                     ADDRESS                     | PROVIDER |  PRICE   |    COUNTRY    |   SPEED TEST    | LATENCY | PEERS | HANDSHAKE | VERSION |    STATUS     |
+---------------------+-------------------------------------------------+----------+----------+---------------+-----------------+---------+-------+-----------+---------+---------------+
| DecentralizeFreedom | sentnode1vqfcl8mx9fkunwse5f3ydqqkr60xz9gp9z9eee |          | 250udvpn | United States | 62.56MB+39.15MB | 1.236s  |     0 | true      | 0.2.0   | STATUS_ACTIVE |
+---------------------+-------------------------------------------------+----------+----------+---------------+-----------------+---------+-------+-----------+---------+---------------+
Tip – Pick ones that use Handshake
Handshake is the future of domains, and a node that includes handshake will allow you to browse Handshake domains without any extra settings or software.
Step 6 – Subscribe to a Node
Now that we are confirmed we like this node (IP / location / price) – time to connect!
Exciting!
This is the template:
sentinelcli tx subscription subscribe-to-node \
    --home "${HOME}/.sentinelcli" \
    --keyring-backend file \
    --chain-id sentinelhub-2 \
    --node https://rpc.sentinel.co:443 \
    --from
And here it is with data inside
So we put:
sentinelcli tx subscription subscribe-to-node \
    --home "${HOME}/.sentinelcli" \
    --keyring-backend file \
    --chain-id sentinelhub-2 \
    --node https://rpc.sentinel.co:443 \
    --gas-prices 0.1udvpn \
    --from youwalletname sentnode1vqfcl8mx9fkunwse5f3ydqqkr60xz9gp9z9eee 2000udvpn
Please note – if you are in countries / locations that block sentinel.co – that command will not resolve. Contact us for the IP address (we do not want to reveal it publicly)
It connects!
Using This Ongoing
You do not need to disconnect when you are done for the day – you can close your laptop, and the next day it will auto connect to the node you are subscribed to.
But if you do want to disconnect:
sudo sentinelcli disconnect \
    --home "${HOME}/.sentinelcli"
Checking your balance / payments
To check how much you have spent so far as a client on the dVPN node:
Command:
sentinelcli query sessions --node https://rpc.sentinel.co:443 --address WALLETADDRESSHEREWhich will give you something like:
+-----+--------------+-------------------------------------------------+---------------------------------------------+----------+-------------------+---------------+
| ID  | SUBSCRIPTION |                      NODE                       |                   ADDRESS                   | DURATION |     BANDWIDTH     |    STATUS     |
+-----+--------------+-------------------------------------------------+---------------------------------------------+----------+-------------------+---------------+
| 152 |           24 | sentnode1vqfcl8mx9fkunwse5f3ydqqkr60xz9gp9z9eee | sent1h3zldt4rqtr2v0tq68xuhsptgh4wur78qzw8y0 | 19h1m56s | 960.72MB+997.61MB | STATUS_ACTIVE |
+-----+--------------+-------------------------------------------------+---------------------------------------------+----------+-------------------+---------------+
How about how much you have spent?
The payment will be settled at the end of the session. While you are using it, it is inactive status.
When you are subscribing to a node, you will be locking some amount (such as this case it’s 1000udvpn)
This amount will be released based on usage.
And you can cancel the subscription at any time, so you get the leftover balance.